Mail merge is a powerful feature that allows you to personalize and send bulk documents, such as letters, labels, or envelopes, using data from an Excel spreadsheet. In this step-by-step guide, we’ll walk you through the process of creating a mail merge using Microsoft Word and Excel, making your communication tasks more efficient and personalized.
Boost your productivity at unbelievably low costs with our 100% legal Microsoft licenses! Explore super affordable deals, unlock powerful features, and transform your digital experience today. Upgrade now for legitimate value!
Step 1: Prepare Your Excel Spreadsheet
- Open Microsoft Excel and create a new spreadsheet or use an existing one
- Ensure that each column represents a field you want to include in your documents, such as First Name, Last Name, Address, etc.
- Enter the data for each recipient in the respective columns
Step 2: Open Microsoft Word
- Launch Microsoft Word on your computer
- Click on the Mailings tab in the ribbon at the top
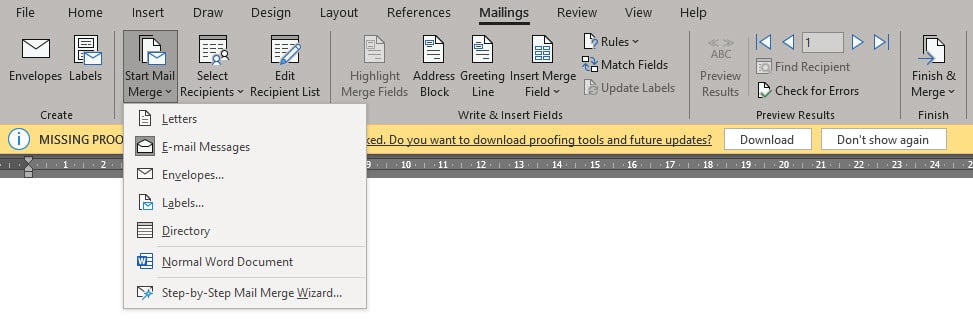
Step 3: Start Mail Merge
- In the Mailings tab, click on the Start Mail Merge dropdown
- Select Letters to create personalized letters. You can also choose other document types like envelopes, labels, etc.
Step 4: Select Recipients
- Click on the Select Recipients dropdown
- Choose Use an Existing List
- Locate and select your Excel spreadsheet containing the recipient data
- Confirm the sheet and range of data if prompted, then click OK
Step 5: Insert Merge Fields
- Click on Insert Merge Field in the Mailings tab
- Select the fields from your Excel spreadsheet that you want to include in your document. For instance, insert First Name, Last Name, and Address
- Repeat this for all the fields you want to merge
Step 6: Preview Your Letters
- Click on Preview Results in the Mailings tab to see how the merged letters will look
- Use the arrow buttons to navigate through the recipients and ensure the data is merging correctly
Step 7: Complete the Merge
- Click on Finish & Merge in the Mailings tab
- Choose Edit Individual Documents
- In the dialog box, ensure All is selected and click OK
Step 8: Save and Print
- Review the merged documents in your Word document
- Save your merged letters and print them as needed
Step 9: Troubleshooting (Optional)
- If you encounter issues during the mail merge, such as incorrect data or formatting problems, review your Excel spreadsheet and merge field placement
- Microsoft Word’s help resources and online tutorials can provide solutions to common mail merge problems
Step 10: Explore Advanced Options (Optional)
- Experiment with other mail merge features like filtering recipients, sorting data, or using conditional fields for more personalized documents
Conclusion:
Congratulations! You’ve successfully learned how to create a mail merge using Microsoft Word and Excel. By following these steps, you can efficiently personalize and send bulk documents, saving time and ensuring accurate communication. Stay tuned for more guides and tips to enhance your productivity with Microsoft Office tools.