Microsoft Outlook is a versatile email client that offers a range of features to enhance your email communication. One of these features is the Send From button, which allows you to send emails from different accounts within Outlook. In this step-by-step tutorial, we’ll guide you through the process of activating the Send From button in Outlook, giving you the flexibility to manage multiple email addresses seamlessly.
Boost your productivity at unbelievably low costs with our 100% legal Microsoft licenses! Explore super affordable deals, unlock powerful features, and transform your digital experience today. Upgrade now for legitimate value!
Step 1: Launch Microsoft Outlook
Open Microsoft Outlook on your computer
Ensure that you have already added multiple email accounts to Outlook
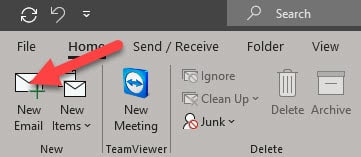
Step 2: Compose a New Email
Click on the New Email button in the Outlook toolbar to start composing a new email
Step 3: Locate the From Field
In the new email window, locate the From field
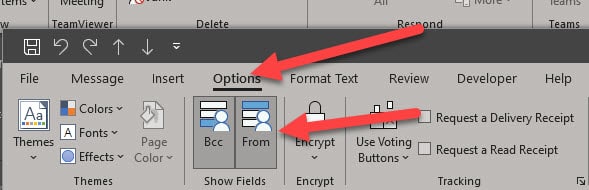
This field may not be visible by default, so if you don’t see it, follow these steps:
- Click on the Options tab in the new email window
- In the Show Fields group, click on From
Step 4: Activate the From Field
Once the From field is activated, you’ll see it appear above the To field in the email composition window
Step 5: Click on the From Dropdown
Click on the From field
This will open a dropdown list containing the email addresses that you have added to Outlook
Step 6: Choose the Send From Address
From the dropdown list, select the email address that you want to use as the sender for this email
Step 7: Compose and Send the Email
Compose your email as usual, including the subject, message, and any attachments
Once you’re ready to send, click the Send button
Step 8: Verify the Send From Address
After sending the email, check your Sent Items folder to confirm that the email was sent from the selected Send From address
Step 9: Change Send From Address (Optional)
If you want to send an email from a different address, repeat steps 2 to 8, selecting a different email address from the From dropdown list
Step 10: Explore Additional Features (Optional)
Explore other features of Outlook, such as creating rules to automatically send from specific accounts, setting a default Send From address, and managing signatures for different accounts
Conclusion:
Congratulations! You’ve successfully learned how to activate the Send From button in Microsoft Outlook. By following these steps, you can easily send emails from different accounts within Outlook, streamlining your communication process. Stay tuned for more tutorials and tips to make the most of your email experience.