Quick Parts in Microsoft Outlook allow you to save frequently used text or content snippets, such as email signatures, phrases, or paragraphs, for easy insertion into your emails. This feature can save you time and help you maintain consistency in your communications. In this step-by-step guide, we’ll walk you through the process of creating Quick Parts in Outlook.
Boost your productivity at unbelievably low costs with our 100% legal Microsoft licenses! Explore super affordable deals, unlock powerful features, and transform your digital experience today. Upgrade now for legitimate value!
Step 1: Launch Microsoft Outlook
Open Microsoft Outlook on your computer
Make sure you’re using a version that supports the Quick Parts feature
Step 2: Compose a New Email
Click on the New Email button in the Outlook toolbar to start composing a new email
Step 3: Type or Paste the Text
In the email composition window, type or paste the text that you want to save as a Quick Part
This could be a standard greeting, a signature, or any other frequently used content
Step 4: Select the Text
Highlight the text that you want to save as a Quick Part
This can be a single word, a sentence, or even a paragraph
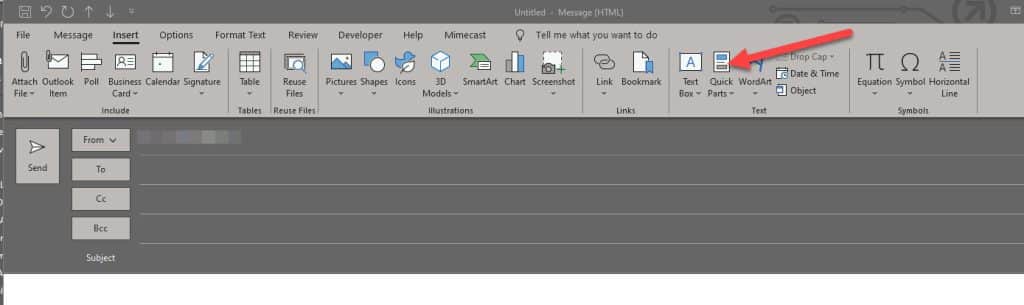
Step 5: Access the Quick Parts Gallery
With the text selected, go to the Insert tab in the Outlook ribbon at the top
Step 6: Open Quick Parts Dropdown
In the Insert tab, find the Quick Parts button in the Text group
Click on the dropdown arrow next to it
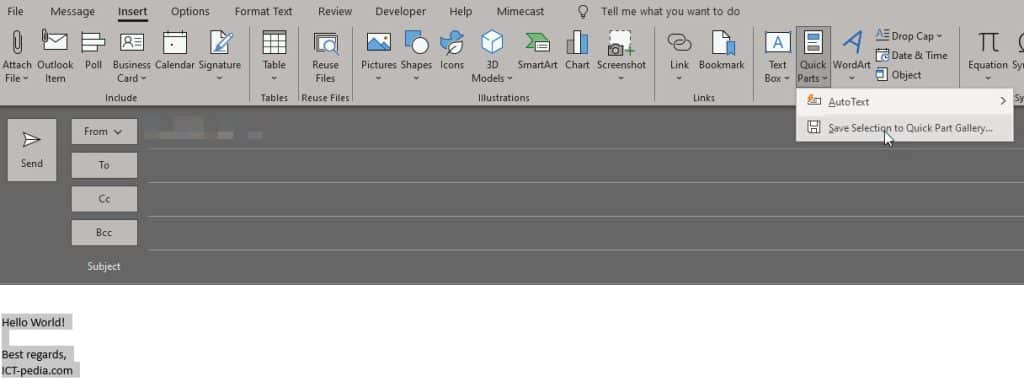
Step 7: Save Selection to Quick Parts Gallery
From the dropdown menu, select Save Selection to Quick Part Gallery
This will open the Create New Building Block window
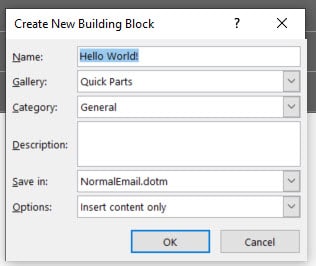
Step 8: Specify Quick Part Details
In the Create New Building Block window:
- Name: Enter a name for your Quick Part (e.g., Signature).
- Gallery: Choose Quick Parts
- Category: Select an existing category or create a new one for organization
- Description: Provide a brief description (optional)
- Save in: Choose NormalEmail.dotm to make this Quick Part available for all emails
Step 9: Save the Quick Part
After specifying the details, click the OK button to save the Quick Part
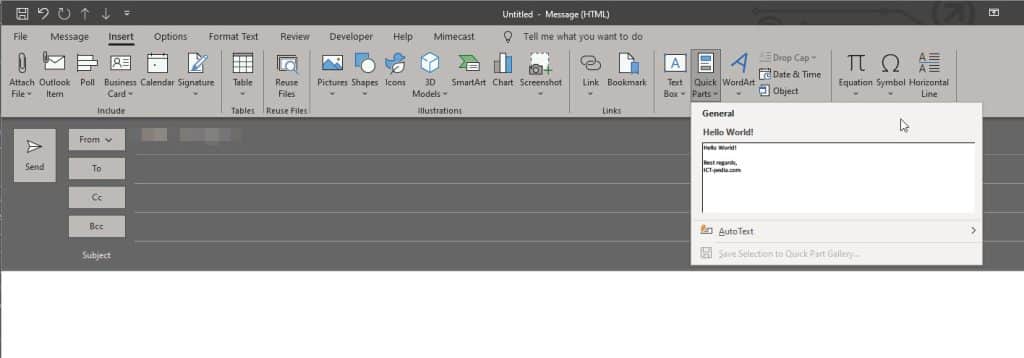
Step 10: Use the Quick Part
To use your Quick Part in an email, start composing a new email or replying to an existing one
Go to the Insert tab, click on the Quick Parts dropdown, and select your saved Quick Part from the list
The saved text will be inserted into your email
Step 11: Edit or Delete Quick Parts (Optional)
To edit or delete Quick Parts, go to the Insert tab, click on the Quick Parts dropdown, and select Building Blocks Organizer
From there, you can manage your Quick Parts
Step 12: Further Customization (Optional)
Explore other ways to use Quick Parts, such as adding them to email templates or using them in calendar appointments
Conclusion:
Congratulations! You’ve successfully learned how to create Quick Parts in Microsoft Outlook. By following these steps, you can save time and streamline your email communications by inserting frequently used text with just a few clicks. Stay tuned for more tutorials and tips to enhance your productivity with Microsoft Office tools.