Introduction
Microsoft SQL Management Studio (SSMS) is a powerful tool for managing and querying SQL Server databases. One of its handy features is the Edit Top Rows command, which allows you to modify the number of rows displayed when editing data directly from a query result. In this tutorial, we’ll guide you through the process of changing the value for the Edit Top Rows command in SSMS.
Step 1: Launch Microsoft SQL Management Studio
Open Microsoft SQL Management Studio on your computer and ensure you have the necessary permissions to access and edit the database
Step 2: Connect to the Database
Connect to the SQL Server database instance you want to work with using your credentials
Step 3: Access SSMS Options
In SSMS, click on the Tools menu in the top toolbar and select Options from the drop-down menu
This will open the Options dialog box
Step 4: Navigate to SQL Server Object Explorer > Commands
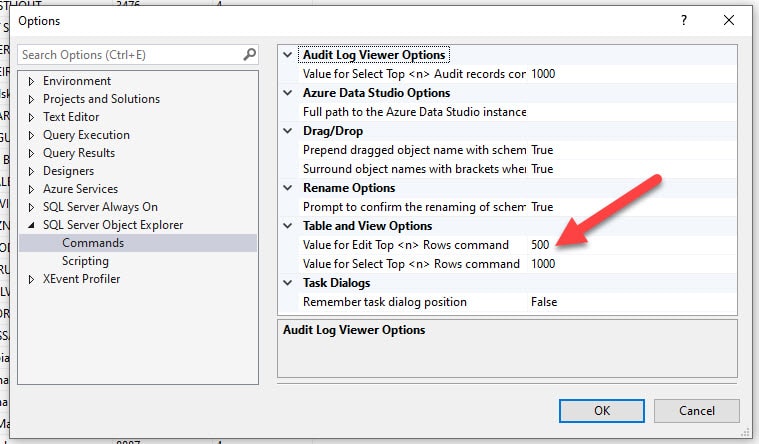
In the Options dialog box, on the left-hand side, expand SQL Server Object Explorer, then click on Commands
Step 5: Locate Edit Top Rows
In the Commands section, find Edit Top Rows from the list of commands
This is the option that controls the default number of rows displayed when using the Edit Top Rows command
Step 6: Adjust the Number of Rows
In the Edit Top Rows option, you’ll see a field labeled Value with the number 200 (default value)
Change this value to your desired number of rows to be displayed when editing data
For example, you can set it to 100 if you want to display only the top 100 rows
Step 7: Apply the Changes
After setting your preferred number of rows, click the OK button at the bottom right corner of the Options dialog box to apply the changes
Step 8: Test the Edit Top Rows Command
To test the changes, execute a SELECT query on a table
Right-click on the query results grid and select Edit Top Rows
The number of displayed rows should now match the value you set in the options
Step 9: Verify Changes
Scroll through the query results grid to ensure that the number of displayed rows indeed matches the value you configured in the options
Step 10: Apply Changes to Other Instances (Optional)
If you have multiple instances of SSMS, you can apply the same row limit to all instances by repeating steps 3 to 9 for each instance
Conclusion
Congratulations! You’ve successfully learned how to change the value for the Edit Top Rows command in Microsoft SQL Management Studio via options. This efficient method allows you to customize the number of rows displayed, improving your data editing experience in SQL Server databases. Stay tuned for more SQL tips and tutorials to optimize your database management skills.